|
I always seem to be laying my Xbox controller down somewhere and well like TV remotes...it disappears. One night I had the idea to make myself a stand. It was a fun little project that provided me with a place to store it.  Before we get started, make sure to follow me on YouTube, Instagram and FaceBook to keep up with all my latest projects! Tools and supplies needed for the project:
First thing I did was draw up a design shape for the stand and transferred it to a 1/4" sheet of plywood so I could cut out a template with my jigsaw.  Next thing I did was cut three pieces out of my 1x4 with my circular saw to be used as the arms and base of the stand. You could use a miter saw as well, just depends on what you have available.  I took two of the cut pieces, tape them together, and gang cut the arm shape out on the bandsaw. At this point you could use a jigsaw but the bandsaw makes it so much easier.  Once my pieces were cut, I clamped them together and took them to the spindle sander to smooth and refine the shape. You can use an orbital sander to do this.  I used a center punch to mark where I wanted to drill my hole. Then I used a 3/4" forstner bit to drill a hole through both pieces so I could connect them with a 3/4" dowel rod. If you don't have a drill press, you can use a drill and drill bit. The process works the same but you have to take extra care to drill straight and slow.  I used my orbital sander to smooth out the arm pieces.  To add some style to the stand, I used my palm router to add a roundover to the edges of the arms.  I cut my connecting dowel rod on the bandsaw.  My arms are ready to be assembled. I gently tapped the dowel rod in one side, flipped it over and tapped the other arm on. Take note to keep the pieces straight and square.  Now it was time to work on the base of the stand. I cut it to its final size, sanded it, and added the same roundover to the edges with my palm router.  Time to add a finish. You can finish it however you like, I chose to use Minwax Jacobean stain and top it off with three coats of wipe on poly.  Once everything was dry, it was time for final assembly. I pre-drilled and counter-sunk 1" wood screws from the bottom of the base.  All done. Now I have a nice storage stand for my controller and hopefully it won't get lost anymore.. 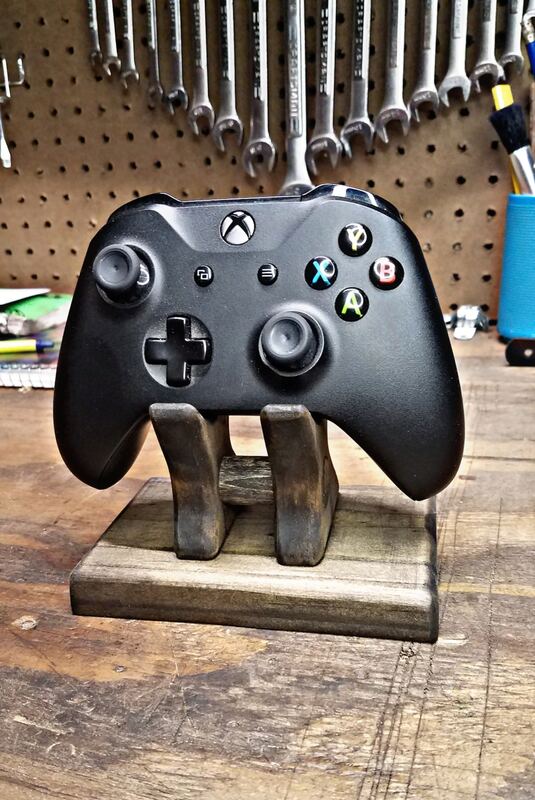
0 Comments
|